
HP Laserjet P4015 Printer Repair | HP Laserjet P4515 Printer Repair | HP Laserjet P4514 Printer Repair
HP LASERJET P4014 PRINTER REPAIR
HP LASERJET P4014 PAPER JAM
HP LASERJET P4014 FUSER ERROR
HP LASERJET P4014 PERFORM MAINTENANCE
HP LASERJET P4015 PRINTER REPAIR
HP LASERJET P4015 PAPER JAM
HP LASERJET P4015 FUSER ERROR
HP LASERJET P4015 PERFORM MAINTENANCE
HP LASERJET P4515 PRINTER REPAIR
HP LASERJET P4515 PAPER JAM
HP LASERJET P4515 FUSER ERROR
HP LASERJET P4515 PERFORM MAINTENANCE
Model Number
Print Speed
Toner Cartridge
Part Number
HP Laserjet P4014 Printer
Introductions Date
May 2008
45 Pages Per Minute
CC364A (10,000 Yield)
Maintenance Kit
CB388A-67903
Fuser Assembly
CB506-67901
HP Laserjet P4015 Printer
Introductions Date
May 2008
52 Pages Per Minute
CC364A (10,000 Yield)
Maintenance Kit
CE525-6901
Fuser Assembly
RM1-6274-000
HP Laserjet P4515 Printer
Introductions Date
May 2008
62 Pages Per Minute
CC364A (10,000 Yield)
Maintenance Kit
CE525-6901
Fuser Assembly
RM1-6274-000


HP Laserjet Printer Repair: A Guide toHP Laserjet P4515 printer repair, HP Laserjet P4015 Printer, Repair, and HP Laserjet P4014 Printer. Repair
HP Laserjet P4014, P4014, P4515 Printer Service
Enjoy dependable, fast, and cost-effective black-&-white printing for one Office Network
Robust production
Together with print speeds of as many as 62 printed pages per minute and a 540 MHz central processing unit, the HP LaserJet P4014, P4015, P4515 Printers Repair is likely to facilitate your Office Environment to perform at optimum functionality. Get continual success along with a maximum performance with the HP Laserjet P4515 latest innovations in toner technology. Known Hewlett Packard stability implies stress-free printing which stacks up to the expectations of one’s workplace.
Simple
Manage your HP Laserjet P4014, P4015, P4515 printer without instruction from Information Technologies Department (IT). HP Laserjet P4015, P4014, P4515 Printer settings and problem research are a snap alongside Show-Me-How features on the user interface panel.
HP Laserjet P4515 Printer Repair: In the world of business printing, few names hold as much weight as Hewlett-Packard (HP). HP’s line of laser printers are some of the best available on the market. Though reliable and efficient out of the box, these machines will eventually need maintenance or repair due to regular wear and tear. As a result it’s important for those who operate models such as HP LaserJet P4515 printer ,P4015 printer ,and/or 4014 printer to understand how they can properly maintain their devices in order to keep them functioning optimally. This guide is geared towards helping you do just that with your specific model(s).
To begin with when any issues arise related with an original set up-up or current operations within these Hewlett Packard products make sure that all connections including power sources are firmly connected prior proper troubleshooting starts; this helps avoid misdiagnosed trouble shooting scenarios associated with hardware faults not relative to core components like fusers rollers feeder trays . Additionally users should always consult online user documentation from manufacturer websites where step by step guides can be found aiding technical support staff in resolving typical malfunctions.
It’s important to remember that HP LaserJet P4515,P4015 and P4014 printers are powered by several small components working together as system. If one or more of these pieces malfunction, the entire unit may go down until identified problems can be addressed and resolved; common examples include feeder tray issues failing to properly carry paper through printing process due misaligned gears causing carriage jams ,fuser assembly over heating situations resulting from worn out fusing assemblies needing replacement . Therefore it is essential for those operating Hewlett Packard products such as above mentioned models to have full understanding on how each individual component works separately, allowing user with even basic technical knowledge ability apply simple repair procedures while also understanding when hardware components need replaced in order continue reliable operation without further damage occurring non corrected parts In other words having TFirm grasp not only makes troubleshooting easier but also reduces chances costly repairs due inexperienced service providers attempting solve malfunctions beyond their limits (e.g replacing logic boards because power supply issue).
On a regular basis users should conduct visual inspections internal components surfaces regularly along cleaning all necessary external areas including dust build up inside cartridges trays sensors helping reduce risks functional errors caused static electric charge traces left behind after contact dry vulnerable components.
Regular maintenance and cleaning is an important part of keeping HP LaserJet P4515,P4015,and/or P4014 printers running smoothly. This includes things like regular replacement of toner drums as well as removing dust buildup from the rollers and sensors which can lead to printing errors or poor quality prints. Cleaning should also be conducted on a regular basis in order for these machines to perform optimally; this involves using compressed air to remove any debris lodged within specific parts such as service rails bushings fuser assembly carriers .Finally it’s recommended that those who operate models such Hewlett Packard products carry out preventive duties regularly eliminating future problems arising due wrong customer settings lack proper calibrations adjustments being applied correctly before use In conclusion ,by taking time learn operating functions related mechanics associated with machinery users are able provide cost effective solutions malfunction scenarios while further predicting potential hardware failures resulting from improper alignments procedures carried prior during after device usage . Doing so helps achieve maximum uptime reliability promoting convenience optimization operations freeing up valuable resources spent towards resolving unnecessary breakdowns occurrences Keywords: HP laserjet P4515 Printer Repair, HP Laserjet P4015 Printer Repair ,HP Laserjet P4014 Printer Repair
How do you fix fuser error HP Laserjet P4014, P4015, P4515?
HP Laserjet P4014 Fuser Error
HP Laserjet P4015 Fuser Error
HP Laserjet P4515 Fuser Error
Message Control Panel
Definition
Remedy
50.X FUSER ERROR
An error has been encountered in the fuser assembly, causing the fuser error.
Listed below are meaning for (x).
- 50.1 Fuser Error – Themister (TH1) Low fuser temperature
- 50.2 Fuser Error – Failure in fuser warming up.
- 50.3 Fuser Error – Temperature exceeding specificed temperuature – High
- 50.4 Fuser Error – Failure drive curcuit causing defective fuser.
- 50.8 Fuser Error – Low temperature of themersister. Thermistor temp in reaching assigned temp. (TH1)
- 50.9 Fuser Error – High temperature of themersister. Thermistor temp in reaching assigned temp. (TH2)
- Recycle power to see if the error is constant and not a mistake.
- Confirm the correct fuser is installed in HP Printer.
- Confirm the correct fuser voltage is being used in the printer. (120v – 220v)
- 50.2 Fuser Error – Confirm connection J8002 and J1505 are seated correctly on the Engine Control Unit (ECU), Also confirm J18 connection is seated properly on the fuser assembly.
- 50.1, 50.3, 50.8, 50.9 Fuser Error – Confirm that the connectioin J1608 & J18 are properly seated on the ECU (Engine Control Unit)
- 50.8 Fuser Error – Take fuser assembly out of printer and examine for paper or toner build up within the fuser rollers.
- 50.4 Fuser Error – Confirm power to the printer specifications for the specific HP Laserjet printer.
Plug printer electrical directly to the wall outlet. Remove any power suppresor, surge protectors.
Note: If the power supplied to the pritner doesn’t meet specifications, the printer will malfuntion.
Confirm connection J1002 and J1505 ore seated on the ECU correctly.
If the error continues to display replace the fuser.
After replacing the fuser assembly and the fuser error still shows, then repalce the ECU (Engine Control Unit)
How do you fix Scanner Error HP Laserjet P4014, P4015, P4515?
HP Laserjet P4014 Scanner Error
HP Laserjet P4015 Scanner Error
HP Laserjet P4515 Scanner Error
Message Control Panel
Definition
Remedy
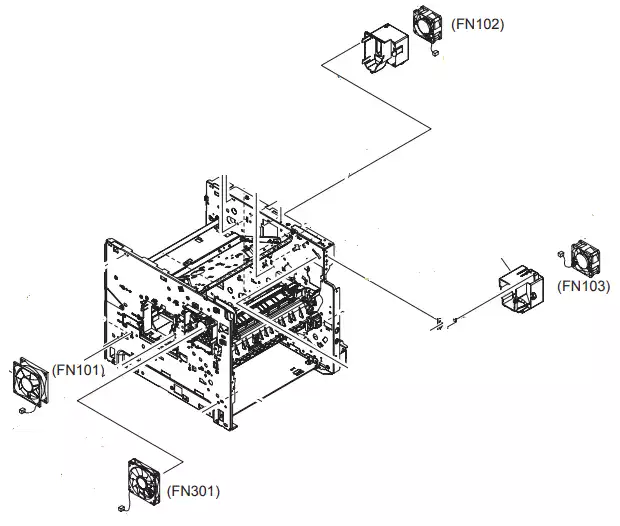
57.01 ERROR FAN
To Continue turn off the on
FN103 Fan has encountered an problem.
- Examine FN103 for fan spinning movement or is being obstructed from spinning.
- Examine the connection at connection J79 withing the DC Controller to verify it is seated properly.
- If the error continues to develop replace the Fan.
57.03 ERROR FAN
To Continue turn off the on
FN102 Fan has encountered an problem.
- Examine FN102 for fan spinning movement or is being obstructed from spinning.
- Examine the connection at connection J75 withing the DC Controller to verify it is seated properly.
- If the error continues to develop repalce the Fan.
57.04 ERROR FAN
To Continue turn off the on
FN101 Fan has encountered an problem.
- Examine FN101 for fan spinning movement or is being obstructed from spinning.
- Examine the connection at connection J64 withing the Power Supply to verify it is seated properly.
- If the error continues to develop repalce the Fan.
How to Fix Fan Error HP Laserjet P4014, P4015, P4515?.
HP Laserjet P4014 Fan Error
HP Laserjet P4015 Fan Error
HP Laserjet P4515 Fan Error
Message Control Panel
Definition
Remedy
57.05 ERROR FAN
To Continue turn off the on
Duplexer Fan has encountered an problem.
- Examine duplexer fan spinning movement or is being obstructed from spinning.
- If the error continues to develop repalce the Duplex Assembly.
57.07 ERROR FAN
To Continue turn off the on
FN301 Fan has encountered an problem.
- Examine FN301 for fan spinning movement or is being obstructed from spinning.
- Examine the connection at connection J65 withing the Power Supply to verify it is seated properly.
- If the error continues to develop repalce the Fan.
How to fix Perform Maintenance on HP Laserjet P4014, P4015, P4515?
HP LASERJET P4014 PERFORM PRINTER MAINTENANCE
HP LASERJET P4015 PERFORM PRINTER MAINTENANCE
HP LASERJET P4515 PERFORM PRINTER MAINTENANCE
Message Control Panel
Definition
Remedy
“Perform Printer Maintenance”
Replace the printer maintenance kit. The printer reached the assigned page count for preventative maintenance installation.
- Order Maintenance kit from Printer Repair Experts (888) 276-4666 to schdule an onsite installation of the maintenance kt by one of our experienced HP Technicians.
Maintenance Kit Part Number.
CB388A-67903
How to resolve Perform Printer Maintenance Displaycd on control panel?
HP LASERJET P4014 FIRMWARE UPGRADE ISSUE
HP LASERJET P4015 FIRMWARE UPGRADE ISSUE
HP LASERJET P4515 FIRMWARE UPGRADE ISSUE
Message Control Panel
Definition
Remedy
AFTER UPGRADING PRINTERS FIRMWARE, PRINTER WILL NOT START CORRECTLY.
We are seeing in the field on the HP LaserJet P40xx and P4515 when the device has an accessory (stacker, 3rd paper tray) the device will not start up properly after upgrading the printers engine firmware.
Each accessory contains its own separate firmware bundle and were seeing the older versions of the firmware is conflicting. We suggest first remove all accessories from the printer, then upgrade the printer engine firmware.to the latest version. Once the printer recycles power the printer should return to a ready state.Power off the printer and attach each accessory and upgrade firmware individually. The latest firmware bundle resolved the conflict.
HP LASERJET P4014 PRINTER RESETS
HP LASERJET P4015 PRINTER RESETS
HP LASERJET P4515 PRINTER RESETS
Restore HP -set defaults
Restoring the Device to the manufacturer-set defaults executes a simple reset and restores most of the manufacturer (default) settings. This item also clears the input buffer for the active I/O.
1. Depress Menu .
2. Depress the downward arrow to identify CONFIGURE DEVICE, and then press OK.
3. Depress the downward arrow to identify RESETS, and then press OK.
4. Depress the downward arrow to identify RESTORE FACTORY SETTINGS, and then depress OK.
Hard disk initialization
A hard disk initialization will delete and reformat the printer hard disk. Execute hard disk initialization only if if an error code shows on the control panel showing a disk error. Constantly try initializing your hard disk prior to exchanging it.
1. Power On the printer .
2. As the printer executes its power-up sequence, depress and hold the Menu button until all 3
lights on the display panel are illuminated.
3. Depress the backwards arrow . The information INITIALIZE DISC shows on the display panel.
4. Depress OK. The device initializes the hard disk and continues the power-up sequence.
NVRAM initialization
WARNING: Initializing N.V.R.A.M erase the,page meters, the event logs, the serial numbers information and the calibration values, along with the EIO (Enhanced Input/Output) card. Utilize the SERVICE menu in order to reinstall the serial number values and page meters. You also may need to reinstall any personal computers that print to this printer to acknowledge the device. Initialize N.V.R.A.M just when positively necessary. In the majority circumstances, use a cold reset to reset printer variables but still maintain the required information in the SERVICE menu.
Prior to initializing N.V.R.A.M print a configuration page as well as a supplies status pages to collect the preceding important information:
● Total page meters
● Serial number
1 Power on the printer and and view the control display.
2. Once the screen starts counting up the memory counter, depress and hold the down arrow until all 3 lights on the control display are illuminated.
3. Depress the upward arrow .
4. Depress Menu . The information SKIP DISK LOAD shows on the control display
5. Depress the upward arrow upwards up until NVRAM INIT is shown, and then press OK. The device initializes N.V.R.A.M and after that proceeds with its power-up routine.
Cold reset
The cold reset un-locks menus that were formerly locked and restores each of the control panel menu items (such as EIO settings) to the HP manufacturer defaults. Cold Resets will not erase the data in the SERVICE menu (same as the printer meter counts and serial id number).
NOTICE: prior to performing a cold reset, print Configuration page and menu map. Use the content on the configuration page to reset any end-user-set configuration that the cold reset process modifies.
Performing a cold reset
1. Power off the printer.
2. For HP P40xx/45xx line of printers: Power up the device, and then press-down OK when the memory counter starts.
3. Keep pressing down OK until all 3 control-panel LED flash once and then stay on. This may take as high as 10 seconds.
4. Following the SELECT LANGUAGE message shows up on the display, depress (upwards Arrow key) or (downward Arrow key) up till COLD RESET is shown.
5. Depress OK. The printer executes a cold reset and then proceeds its power-up sequence.
6. verify all I/O settings and reset any end-user-set configuration information.
Articles of Interest

Printer Repair Experts
Are you feeling the pressures of an upcoming due date, only to be confronted with an HP Laserjet printer not working? Locating an experienced

HP Laserjet M601 Loud Noise Fix: A Toner Solution
HP Laserjet M601 Loud Noise Fix: A Toner Solution. Learn the role of the toner cartridge in printer noise and how a simple swap can bring back the peace.

HP LaserJet M601 Fuser Errors: Your Step-by-Step Guide
HP Laserjet M601 Fuser Error: Comprehensive Guide to Fixing 50 Fuser Error
The HP Laserjet M601 Fuser Error: Understanding
